
Search results
"meat mincers Moulinex ME546810" - Results: 603
search.header.categories

Products
FAQ
• You can wash the mincer head, perforated plate, blade and accessories with soapy water. Do not wash them in the dishwasher.
• Grease the perforated plate and the blade with cooking oil to keep them lubricated.
• Make sure there are no bones, cartilage or nerves in the pieces of meat.
• Check the state of wear of the perforated plate and the blade.
• Check that the blade is mounted in the correct orientation on the screw.


For easier cleaning, rinse the accessories immediately after use.
Wash and dry the accessories: they can be washed in the dishwasher, in water or under the tap, with the exception of the motor unit, the mincer assembly (reducer + mincer head)*, the mixer drive unit*, and the juicer body* (* depending on model). Wipe these with a damp sponge.
Once they have been dried, coat the blade and mincer grills with cooking oil to keep them lubricated.
Pour hot water with a few drops of washing-up liquid into the mixer bowl, close the lid fitted with the feeder cap, pulse a few times, unplug the appliance and rinse the bowl.
The blades of the accessories are very sharp, handle them with care.
- From the recipe search page:
Click on the search bar and then on the tile "Want to share your best recipes? Create them" and follow the instructions.
- From the "My Universe" tab:
Click on "My creations" then "Propose your recipe" and follow the instructions.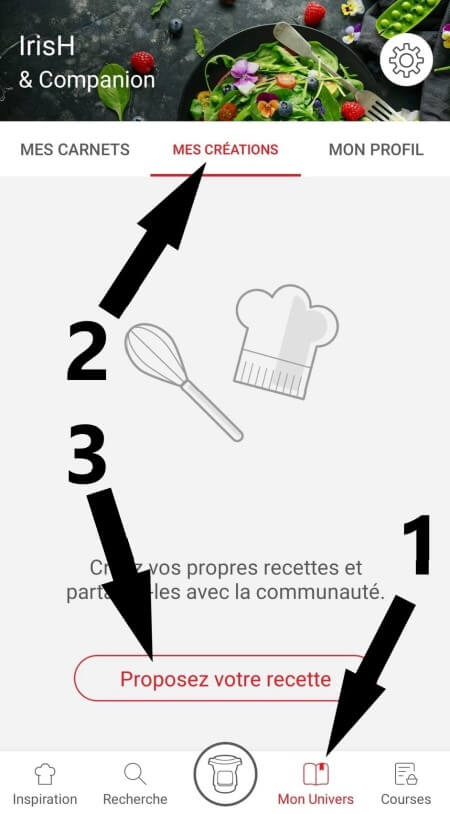
- You can also click directly on the following link, especially from your computer:
https://myrecipe.companion.moulinex.fr/#/login
The serrated blade is ideal for kneading heavy or yeast dough and crushing nuts or ice cubes.
Use the "Steam cooking" program to cook this type of preparation.
• Steaming basket (1)
The steaming basket can be used to steam vegetables, fish or meat and to make soups with chunks.
• Mixer (2)
It mixes cooked dishes without damaging the ingredients (browned dishes, stews, risottos, ratatouilles, chutneys and pulses).
• Beater (3)
It is used for mayonnaise, whipped cream, sauces, creams and dressings (mashed potatoes, polenta...), whisking egg whites.
• Kneading/crushing knife (4)
It kneads white bread dough, special breads, short crust pastry, biscuit dough, risen dough (brioche, kouglof...), light batters (cake mixture...). You can also make pancake/waffle batter with this accessory. It crushes nuts, chops hard products and crushes ice.
• Ultrablade cutting knife (5)
It mixes (soups, fruit purees) and chops (vegetables, meat, fish). Do not use this accessory to chop hard products, use the kneading/crushing knife to do this.

• Pour 10 cl of white vinegar into the bowl with the spindle and leave it for 1 hour.
• Empty the bowl and wipe the inside with a sponge.
• Rinse the bowl several times with clean water.
Make sure you are using the recommended speed and the appropriate accessory.
Check that the appliance is stable (resting on its rubber feet) and the work surface is quite rigid.
There is a hot zone on the left (when positioned in front of the appliance), and a less hot zone on the right.
Our appliance complies with French/European standards in terms of radio frequency emission, including limiting human exposure to electromagnetic fields.
Your appliance is equipped with a grounding system, always connect your appliance to a grounded outlet.
Always keep in mind the precautions to take for pacemaker wearers.
* for models with click and mix accessories, these types of use are possible (see instructions for your hand blender).
• The volume of ingredients is too high, do not exceed the maximum filling level for the jug as stated in the instructions for use.
• The lid is not correctly positioned, lock it securely on the blender jug.
If the lid has a seal, check its condition and change it if necessary.
Leak from the bottom of the jug:
• Check that the removable blade unit is correctly positioned on the jug, it must be correctly inserted in the jug (there must be no gap between the blade unit and the bottom of the jug).

• Check that the seal is positioned the correct way around on the blade unit - the 3 folds of the seal must be visible once it is in place. If it is positioned in the other direction, you will not be able to lock the blade unit on the jug.

• Check the condition of the seal and change it if necessary.
• Check that your jug is not split or broken as a result of impact.
If the leak persists, take the appliance to an approved repair centre.
To clean the jug, use soapy water or a washing-up liquid.
For easy cleaning, you can use the "Automatic cleaning" program:
• Fill the jug with 1 litre of hot water and 2 or 3 drops of washing-up liquid.
• Press the "Automatic cleaning" program and wait for the program to finish.
• Finish cleaning the jug with a sponge.
The jug, the blade unit without titanium coating and the locking ring are dishwasher safe. They must be disassembled and placed separately in the dishwasher.
CAUTION
• Please do not put the blades with titanium coating in the dishwasher.
• The blades are extremely sharp; handle them with care when using or cleaning the appliance.
Once logged in, you will be able to read the comments and see the notes that community members have given to the recipe by clicking on the notes/comments area.


"The Perfect Mix" is a feature dedicated to blenders. Developed with a French Chef, this feature offers you many ideas of combinations with different ingredients.
Choose a fruit or a vegetable, a type of preparation and discover the possible combinations organised in three levels:
- Authentic: simple combinations with another fruit or vegetable.
- Intrepid: add an extra touch with the addition of a spice, condiment or flavouring.
- Velvet: go even further with an extra touch of deliciousness (coffee, chocolate, dairy products, oils etc.).
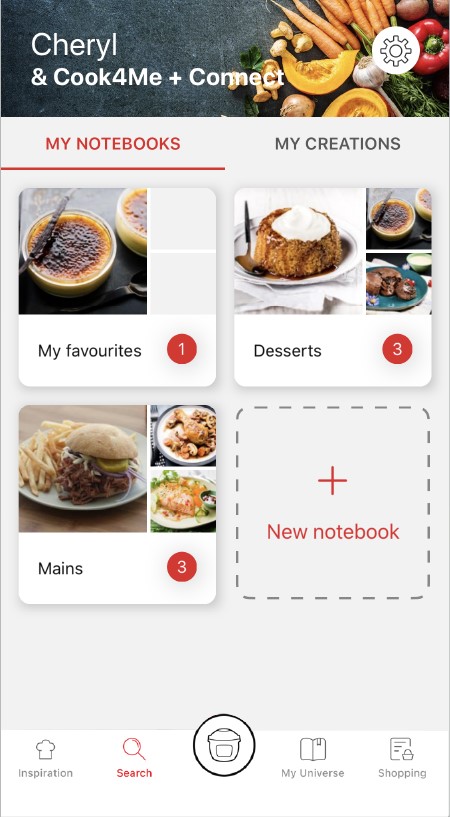
• Choose the "My Universe" tab in the navigation bar.
• There, you will find your recipe booklets and can create new ones by clicking on "New booklet".
If you wish, you can disable them from your smartphone settings.
Once logged into your account, you will be able to rate the recipe and add a comment by following the instructions that appear on the screen after clicking on the notes/comments space.


It will also let you add your accessories and access the associated recipes.
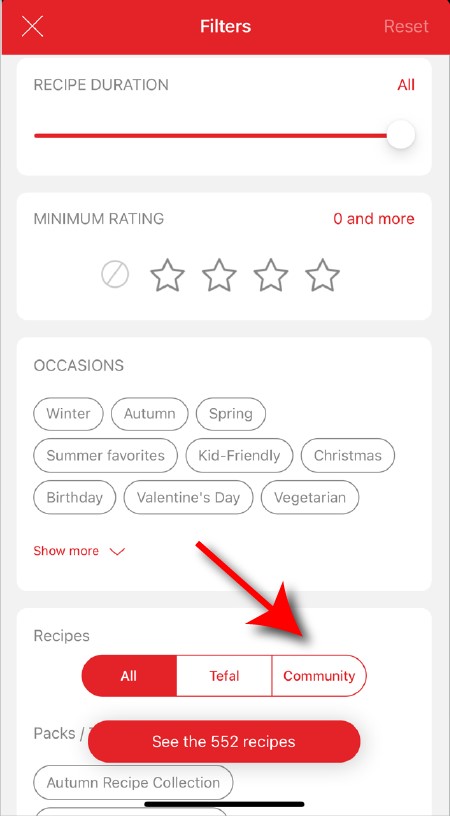
The customizable filter:
• Click on "Filter" in order to sort the recipes according to the type of dish (starter, main course, dessert), the time it takes to make the recipe, the minimum rating, their themes (or packs)...
• You can also choose to select only the recipes of the brand or the recipes proposed by the community.
Sorting recipes:
Once you have made a search, you can sort your recipes by popularity, rating, age or alphabetical order.
• Go to the recipe you wish to bookmark and select the bookmark logo in the top right corner.

• A "My Notebooks" tab appears: select the "My Favorites" location.
• The recipe has been added.
In the "Recipes" section, select "Community" only.
You will then be able to see the recipes from the community.
Click the sharing logo to view the sharing options.

You can then choose how you would like to share this recipe.
 Cookies are used for audience measurement and personalization to help us improve your use of the product.
Audience measurement solutions allow us to analyze traffic, trends, usage and identify malfunctions in order to improve your experience.
Personalization solutions allow us to improve the quality of the information and services we provide and make your experience more enjoyable.
You can accept or deny the use of cookies when you first launch your device.

• Check that the gasket/seal is positioned the correct way around on the blade unit - the 3 folds of the gasket/seal must be visible once it is in place. If it is positioned in the other direction, you will not be able to lock the blade unit on the jug.
• Check the condition of the seal/gasket and change it if necessary.
• Check that your bowl is not split or broken as a result of impact.
If the leak persists, take the appliance to an approved repair centre.
• The volume of ingredients is too high, do not exceed the maximum filling level for the bowl as stated in the instructions for use.
• The lid is not correctly positioned, lock it securely on the mixer bowl.
If the lid has a seal, check its condition and change it if necessary.
Leak from the bottom of the bowl:
• Your appliance does not have a removable blade unit: the seal on your blade unit may be damaged, have it checked by an approved repair centre.
• If your appliance has a removable blade unit: check it is positioned correctly on the jug. You need to ensure that the black notches on the blade unit are fitted fully into the equivalent recesses on the base of the jug – this will be apparent if you cannot turn the blade unit any further and if you turn the jug upside down you should not be able to see any gaps between the jug and the blade unit.
• Check that the gasket/seal is positioned the correct way around on the blade unit - the 3 folds of the gasket/seal must be visible once it is in place. If it is positioned in the other direction, you will not be able to lock the blade unit on the jug.
• Check the condition of the seal/gasket and change it if necessary.
• Check that your bowl is not split or broken as a result of impact.
If the leak persists, take the appliance to an approved repair centre.
• Enter a word in the search field.
Tip: recipes are found using key words, so it is easier to enter a type of vegetable (e.g. carrot) rather than just vegetable.
If your application does not download correctly, delete it and try to download again when you have a more stable Wi-Fi connection.
During initial installation, the download may take several minutes while the application saves all the photos on your Smartphone or tablet.
However, the grey cookies banner will remain on your screen as long as you do not click on "accept".
• Click on the image of the registered product.
• Click on "Remove the product". The app will then ask you to select a product.
If you want to turn off this signal, simply deactivate it in your tablet or Smartphone.
You may also disable sounds in the parameter settings for notifications on your telephone or tablet.
Stop and leave the blender on pause for 15 minutes before restarting.
The volume of ingredients to be blended is too high, reduce the quantity of ingredients.
If the vibrations persist, contact an approved repair centre.
Our appliance complies with French/European standards in terms of radio frequency emission, including limiting human exposure to electromagnetic fields.
Your appliance is equipped with a grounding system, always connect your appliance to a grounded outlet.
Always keep in mind the precautions to take for pacemaker wearers.
If you use fruit that is over-ripe, the filter will become clogged more quickly.
Nor is it necessary to remove the small seeds from watermelon or grapes but you must remove the stones from fruit such as peaches, cherries, etc.
The filter should be pre-cleaned with a soft brush in cold water and handled with care.
All removable parts are dishwasher safe with the exception of the juice collector. The juice collector should be washed in soapy water.
• Pour 10 cl of white vinegar into the bowl with the spindle and leave it for 1 hour.
• Empty the bowl and wipe the inside with a sponge.
• Rinse the bowl several times with clean water.
The volume of ingredients to be blended is too high, reduce the quantity of ingredients.
If the vibrations persist, contact an approved repair centre.
Our appliance complies with French/European standards in terms of radio frequency emission, including limiting human exposure to electromagnetic fields.
Your appliance is equipped with a grounding system, always connect your appliance to a grounded outlet.
Always keep in mind the precautions to take for pacemaker wearers.
To add flavour to chicken, meat and fish made with marinades, use barbecue sauce or spice mixtures.
Please put the water in the water tank with the grey part in the middle (the heater).
[Check 2] Did you put enough water in the water tank?
If there is not enough water in the water tank, it won't be able to create steam. Even if just cooking for a short time, you should ensure that the water reaches at least the top of the heater (the grey part). Even if you have put in enough water, it will take some time before it starts steaming.
[Check 3] Is the heater (grey part) dirty?
If there are minerals from the water adhered to the heater, it may not transmit heat correctly and steam may not be created. If there are changes such as discolouration of the heater - brown, black or white - or peeling of the surface, care of the heater will be necessary. Please carry out a descaling.
Leave to act cold for 1 night.
Rinse the inside of the water tank several times with warm water.
Never use abrasive cleaning products.
- From the recipe search page:
Click on the search bar and then on the tile "Want to share your best recipes? Create them" and follow the instructions. - From the "My Universe" tab:
Click on "My creations" then "Propose your recipe" and follow the instructions. - You can also click directly on the following link, especially from your computer:
https://myrecipe.companion.moulinex.fr/#/login
The serrated blade is ideal for kneading heavy or yeast dough and crushing nuts or ice cubes.
Use the "Steam cooking" program to cook this type of preparation.
• Steaming basket (1)
The steaming basket can be used to steam vegetables, fish or meat and to make soups with chunks.
• Mixer (2)
It mixes cooked dishes without damaging the ingredients (browned dishes, stews, risottos, ratatouilles, chutneys and pulses).
• Beater (3)
It is used for mayonnaise, whipped cream, sauces, creams and dressings (mashed potatoes, polenta...), whisking egg whites.
• Kneading/crushing knife (4)
It kneads white bread dough, special breads, short crust pastry, biscuit dough, risen dough (brioche, kouglof...), light batters (cake mixture...). You can also make pancake/waffle batter with this accessory. It crushes nuts, chops hard products and crushes ice.
• Ultrablade cutting knife (5)
It mixes (soups, fruit purees) and chops (vegetables, meat, fish). Do not use this accessory to chop hard products, use the kneading/crushing knife to do this.
• Pour 10 cl of white vinegar into the bowl with the spindle and leave it for 1 hour.
• Empty the bowl and wipe the inside with a sponge.
• Rinse the bowl several times with clean water.
Make sure you are using the recommended speed and the appropriate accessory.
Check that the appliance is stable (resting on its rubber feet) and the work surface is quite rigid.
There is a hot zone on the left (when positioned in front of the appliance), and a less hot zone on the right.
Our appliance complies with French/European standards in terms of radio frequency emission, including limiting human exposure to electromagnetic fields.
Your appliance is equipped with a grounding system, always connect your appliance to a grounded outlet.
Always keep in mind the precautions to take for pacemaker wearers.
• For pastry, use trays with a non-stick coating to make it easier to turn them out.
• Preheat your oven.
• Put your tray or meat on the grill as close as possible to the grill element without your food touching the element.
• You can put a tray or the drip tray with a little water directly on the base element or smooth base which does not heat up so that you can collect the grease or juices from the food you are cooking.
• Leave the door ajar (depending on model).
• Position the function selector in the "grill" position.
• Set the required cooking time using the timer.
The oven starts up. For meat, it is necessary to turn the food to be grilled halfway through the cooking time (sausages, etc.).
At the end of the cooking time, if the programmed cooking time has run out, the oven stops automatically, if not, set the timer to zero.
• Place the shelf at the required height.
• Position the function selector to the oven position.
• Put the tray of food in the oven and close the door.
• Set the thermostat to the required temperature.
• Set the timer.
The oven heats up and stops automatically according to the programmed time. You always have the possibility of interrupting cooking by moving the timer to zero.
Pre-heating is not always necessary (depending on the recipe). The temperature of the door and walls is high when the oven is in operation. Please note, do not place the tray directly on the base element or the smooth base.
Check that you have not left a fork or metal utensil inside the oven.
Make sure that you have removed the aluminium cover from your tray.
You have forgotten to remove the metal tie from your freezer bag.
• Put a glass of cold water in the microwave.
• Put in an example of the crockery that you want to test.
• Operate the appliance in the maximum position for one minute, the item that you have put into test should still be cold or only very slightly warm.
A glass plate is not suitable because it heats up very quickly.
Plates with metal gilding are not suitable because the gilding will disappear.
Do not put metal objects in the microwave on.
• Selected models include a multi-position thermostat that lets you choose between various cooking temperatures. The lower position regulates the oil at around 170°C / 338°F, the higher position at 190°C / 374°F. The lower setting may be used when cooking delicate foods that do not stand up well under higher temperatures (mushrooms, some types of fish). The higher setting will provide excellent results when deep-frying chips, meat, prepared frozen foods, vegetables etc.
• Leave the product to cool down.
• Use the RESET function on the base unit.
‒ Conventional cool wall fryers do not have a RESET function. Please take your product to one of our approved repair services.
Never mix different types of oil in your fryer, they may have different boiling points.
If you use solid vegetable fat:
• cut it into pieces and melt it in a bowl (at 150 °C) before putting it into your fryer.
• never melt solid fat in the basket of your fryer.
Never put solid fat directly into the frying basket.
It is deactivated by the device for the preparation of programmed recipes containing fragile ingredients such as milk, fish, meat or eggs (see manual).
Only possible with some ingredients such as rice, cereals and vegetables up to 15 hours in advance.
These are health requirements to avoid possible undesirable bacterial growth.
When choosing delayed start, you must set the current time and the time you want your recipe to be ready.
The recipe sequence is then the same as for an immediate start.
The delayed start is only available in the "manual cooking" and "ingredient cooking" modes for certain ingredients only.
• The light is flashing: the device is not connected to a tablet or smartphone.
• The light is not flashing: the device is connected to a tablet or smartphone.
• The light is off: the product's "connect" feature is disabled.
To restore the original appearance: using a sponge and a mixture of hot water and white vinegar, clean and then rinse the pot thoroughly.
Our advice: for greater satisfaction over time of your pot, we recommend manual washing with a mild detergent.
The seal should be changed every 3 years at the most. Take your device to an approved service centre.
To reactivate it:
1. Go to the "settings" menu
2. Select the "Connect" menu
3. Select "ON"
• Check that the nut of the metal lid is quite tight.
• Check that the violet ball cap (located on the top of the metal lid) is in the correct locked position (closed lock).
• If you are at the end of cooking and you want to close the lid, wait until the hot vapours have dissipated before closing the lid.
• Check for foreign bodies between the bowl and the heating plate. Remove the bowl and check that the heating plate, the central element and the underside of the bowl are clean. Also check that the central element can move freely.
• The bowl may be deformed (after an impact, fall...). The bowl must be changed at an authorised service centre.
• Check that the lid is in proper position for closing (align the small arrow and lock the lid clockwise).
• Check for foreign bodies between the bowl and the heating plate. Remove the bowl and check that the heating plate, the central element and the underside of the bowl are clean. Also check that the central element can move freely.
• The bowl may be deformed (after an impact, fall...). The bowl must be changed at an authorised service centre.
• If you do several cookings in a row, make sure that the water level in the tray is kept at the minimum.
• Make sure you clean your product after each use: clean the grill to remove cooking grease as well as drain and clean the water tray.
• Never place aluminium foil in the water tray, between the heating element and the grid or directly on the cooking grid.
• Some foods with a superficial skin (whole sausages, tongue, poultry) or large pieces of meat can splatter by trapping boiling liquids. This is why we advise you to prick them before cooking with a knife or a fork.
We remind you not to leave your product unattended with food in use (preheating and/or cooking).
• Fresh yeast in cubes (to be crumbled between the fingers)
• Dry active yeast for rehydration (in a little warm water at around 35°C)
• Or instant dried yeast.
When a sachet of yeast has been opened it should be used within the next 48 hours at the most. If you are using fresh yeast, multiply by 3 the weight indicated for dry yeast. You will find more detailed information in the instruction manual.
| Dried yeast (in teasp.) | Fresh yeast (in g.) |
| 1 | 9 |
| 1,5 | 13 |
| 2 | 18 |
| 2,5 | 22 |
| 3 | 25 |
| 3,5 | 31 |
| 4 | 36 |
| 4,5 | 40 |
| 5 | 45 |
• Above all, never leave a hot iron unattended.
This is not only to avoid overheating of the iron or the surface on which it is placed but also to ensure that no-one gets burned. If safety is one of your main concerns, choose an iron that has an automatic cut-off function.
Never leave a hot iron within reach of children or pets who risk knocking it over and injuring themselves.
• Like any electrical appliance, never put your iron in water.
• Do not use an iron that has fallen down or has a damaged power cord. If you have the slightest doubt concerning the condition of your iron, contact the Service Centre.
• Always unplug your iron before leaving it, cleaning it or filling it with water (unless it is a model that has a removable water tank). Regularly check the water level to ensure that there is always enough.
Instructions
Recipes

Grind the meat in the Moulinex Masterchef Gourmet mincer head. Heat the oil in a frying pan and add the onion, garlic, 1 teaspoon of ginger, red pepper and meat. Sauté the ingredients on medium heat for 2 to 3 minutes then add the curry and cook for ...
Fry the eggplant slices in hot oil then transfer them to paper towels to drain. Mince the meat in the Moulinex HV6 Mince & Chop using the small grid. Turn over the meat mincer and place the chopper. Thinly chop the onion. Preheat the oven to 200°C. H ...
Mince the meat with the mincer head fitted with the smallhole screen, on speed 3. Put the meat in the stainless steel bowl. Add the chopped onions, breadcrumbs, chopped coriander and parsley. Run the appliance fitted with the mixer and lid on speed 1 ...
Mince the meat in the Moulinex HV6 Mince & Chop using the small grid then put in a bowl. Turn over the meat mince and place the chopper. Thinly chop the onion then the carrot, coriander, garlic, pine nuts and ginger. Heat the oil in a medium pan and ...
Soak the bulgur in cold water for a little time then drain and grind for 3 times using the Moulinex Masterchef Gourmet head mincer. Mince half of the meat finely and the other half coarsely using the Moulinex Masterchef head mincer. To prepare the fi ...
Mince the meat in the Moulinex HV6 Mince & Chop using the medium grid then put in a large bowl. Turn over the meat mincer and place the chopper. First, thinly chop 1 onion with the garlic, then the parsley with the coriander. Mix the vegetables with ...
Mince the meat in the Moulinex HV6 Mince & Chop using the medium grid then put in a bowl. Turn over the meat mincer and place the chopper. Thinly chop the onion and squeeze out its juice with your hands. Add the chopped onion to the meat. Repeat with ...
Mince the meat in the Moulinex HV6 Mince & Chop using the small grid then put it in a large bowl. Turn over the meat mincer and place the chopper. Chop the onion and squeeze out its juice with your hands. Add the chopped onion to the meat. Chop the p ...
Mince the meat finely using the Moulinex Masterchef Gourmet head mincer. Fry the chopped onion with oil and butter in a large pan until brown. Add the minced meat and stir until cooked. Season with the spices and add the pine nuts. To prepare the dou ...
Peel and chop the onion, then mix it well in the Moulinex Masterchef Gourmet with the veal, gram flour, egg, turmeric powder and salt. Cut the dough into small pieces, then shape the pieces in the palm of your hands until round. Press on them and mak ...
To prepare the kibbeh: chop the meat using Moulinex’s La Moulinette Force chopper. Mix the meat with bulgur in a bowl then season with salt, black pepper and cumin. Knead the ingredients with your hands until well-combined. To prepare the filling: in ...
Wash the bulgur wheat in running water and leave it swell up in warm water. With the mincer head fitted with the smallhole screen, mince the meat on speed 4. Divide the minced meat into two equal portions. Chop the onions finely. Fry the pine nuts in ...
Preheat the oven to 200°C. With the mincer head fitted with the small-hole screen, mince the meat on speed 4. Put the minced meat and all the other ingredients in the stainless steel bowl. Fit the stainless steel bowl, the mixer and the lid and blend ...
Chop the meat using Moulinex’s La Moulinette Force chopper. Add breadcrumbs, parsley, egg, mustard, Worcestershire sauce, salt and pepper. Mix the ingredients well until combined. Divide the meat into 8 balls and mold each piece into roundish shape, ...
With the mincer head fitted with the small-hole screen, mince the meat on speed 4. Put the minced meat and all the other ingredients in the stainless steel bowl fitted with the mixer. Blend for 30 sec on speed 1 and 1 min 30 sec on speed 2 until you ...
Heat oil in a pot over medium heat and sauté onions until browned. Add meat and season with salt and black pepper. Mix ingredients from time to time until the meat turns brown from all sides. Combine in ULTRABLEND + the meat stock, tomatoes, garli ...
Preheat the oven to 180°C Chop the meat using Moullinex’s La Moulinette Force chopper. Mix the bulgur with onions, black pepper, cumin, cinnamon and peppermint. Add the bulgur mixture to the meat and mix the ingredients until well combined. To prepar ...
Wash the blacked eye peas well then soak in water for 4 to 5 hours. Chop the onion, garlic and pepper then put them in the Moulinex Masterchef Gourmet head mincer along with the peas. Mince the ingredients well then season with coriander, salt and cu ...
In a large pan, put 1 tablespoon of olive oil on medium heat then add the onions and the garlic. Stir the ingredients with a wooden spoon from time to time until done. Grate the carrots using the stainless steel disc of the Moulinex Masterchef 9000 f ...
To prepare the dough: knead all the ingredients together in the Moulinex Masterchef Gourmet stainless steel bowl. Flatten the dough and cut into circular shapes. Fry the dough pieces in oil until puffed and round. Leave the fried bread to cool then r ...
Prepare the ingredients. Mix the flour, water, and half of the salt. Let the dough rest for 2 hours. Dice the onion and add to them the meat, remaining salt, cumin, olive oil, and pepper. Roll out the pastry in a thin layer. Cut it into circles of 8 ...
Preheat the oven to 220⁰C. Grease a pan with vegetable oil. In your food processor, process meat, parsley and onion until you get a smooth texture. Add tomatoes, olive oil, black pepper, cardamom and salt. Process again until you get a smooth past ...
Prepare the ingredients. Wash the jareesh and rice together. Dice the onion & cut the meat into cubes. Add the ghee, onion, and lamb pieces into the pan. Stir for 2 min. Add the stock, jareesh, and rice. Pressure cooking. Add the yoghurt and stir wel ...
In the Moulinex Masterchef Gourmet stainless steel bowl, beat the flour, yeast and sugar with some warm water until you get a smooth and soft dough ball. Cover dough with plastic wrap and let rise in a warm place for 1 hour. After rising, mix the dou ...
Mix the kofta ingredients in the Moulinex Masterchef Gourmet stainless steel bowl. Pat the mixture around the skewers and broil in the oven until well cooked. Prepare the sauce by mixing all the ingredients together in the Moulinex Masterchef Gourmet ...
Melt the honey in 2 ¾ cups of water and mince the nuts coarsely. Put the nuts in the Moulinex Masterchef Gourmet stainless steel bowl and then add the raisins, sweetened dried fruits, apricot jam and melted honey. Add flour, yeast, cinnamon and ginge ...
Melt the yeast in 2 tablespoons of lukewarm water in a small bowl. Cover the bowl and leave in a warm place for 15 minutes. Mix the semolina, flour and salt in the Moulinex Masterchef Gourmet stainless steel bowl and add the eggs. Add the milk and th ...
Melt the sugar and the yeast in the lukewarm water. Mix the flour with the milk and the water in the Moulinex Masterchef Gourmet stainless steel bowl. Add the sugar and the yeast. Mix the ingredients well until combined. Cover the mixture with plasti ...
Knead 150 g of flour with the yeast melted in warm water in the Moulinex Masterchef Gourmet stainless steel bowl. Put the dough in a bowl, cover it with plastic wrap and let rise for 50 minutes. Add the remaining flour to the dough along with soft an ...
Boil peas for 1 minute then drain. Put basil with 50 g ricotta cheese in the Moulinex Masterchef Gourmet stainless steel bowl. Mix with cream and eggs and season with salt, pepper and nutmeg. Fit ready-made pie crust roll in a greased tart mold and a ...
Beat the sugar with eggs and vanilla in the Moulinex Masterchef Gourmet stainless steel bowl. Add the melted chocolate, oil, flour, cocoa and pistachios. Pour the mixture in a 23 to 30 cm rectangular shaped tin and bake in a preheated 180°C oven for ...
To prepare the crepes dough: in the Moulinex Genuine blender, put the milk, sugar, vanilla extract, salt, eggs and flour. Blend the ingredients well with the help of the mix stick until smooth. Prepare the coconut: place the grater in the Moulinex Ge ...
In the Moulinex Genuine blender, place the grinder and chop the mint leaves. Peel the lemons. Fix the blender and put in the lemons, sugar, crushed ice and a pinch of salt. Pour in the water. Blend with the help of the mix stick until combined then a ...
Whisk the egg yolks with the whole egg and sugar in the Moulinex Masterchef Gourmet bowl until you get a pale yellow and foamy mixture. Add sieved flour and mix all ingredients. Add the vanilla, pour gradually the warm milk then heat over low heat fr ...
Preheat oven to 180°C and grease a pan with butter. Mix the butter, chocolate and sugar in a saucepan on low heat until the mixture softens. Leave aside to cool. Whisk the eggs in the Moulinex Masterchef Gourmet stainless steel bowl then add the flou ...
In a small bowl, mix the yeast with the water and a pinch of sugar. In the Moulinex Masterchef Gourmet stainless steel bowl combine the flour, corn starch and salt. Mix the ingredients using the beater then add the yeast mixture to get a smooth batte ...
Combine sieved white flour, fresh yeast and salt in the Moulinex Masterchef Gourmet stainless steel bowl. Add water while kneading with the kneading hook and proceed until you get solid dough. Knead dough into a smooth firm ball and place in a lightl ...
Cook the pasta following the pack instructions. Drain and put aside in a baking dish. Cut the carrots into round slices using the stainless steel disc of the Moulinex Masterchef 9000 food processor. Heat the butter in a pan and sauté the carrots with ...
Preheat the oven to 190°C. Cut the potatoes into round slices using the stainless steel disc of the Moulinex Masterchef 9000 food processor. In a large pot, melt 2 tablespoons of butter and cook the onions for 5 minutes until tender. Pour the chicken ...
Combine yeast, sugar and water then sprinkle a pinch of flour on the mixture. Cover and allow to sit for 10 to 12 minutes until bubbly. Mix 1 teaspoon of salt, the oil, 1 egg and the yeast mixture well in the Moulinex Masterchef Gourmet stainless ste ...
Preheat oven to 150°C. Beat the butter and the sugar in the Moulinex Masterchef Gourmet stainless steel bowl until the mixture is smooth. Add the flour and the powdered cardamom then mix well. Shape the dough into small-sized balls. Arrange the cooki ...
Peel and seed the mango then put the slices in the Moulinex Masterchef Gourmet blender. Add lemon juice and zest. Add sugar, yogurt and a little bit of water until mixture is well blended and smooth. Pour the content into a glass and serve immediatel ...
Combine yeast, water and 1 tablespoon of sugar. Allow mixture to sit for 15 minutes until foamy. Pour the mixture in the Moulinex Masterchef Gourmet stainless steel bowl and add the remaining sugar with the butter and salt. Add each 140 g of flour se ...
Chop the onion and the garlic cloves using Moulinex’s La Moulinette Force chopper then add the chicken and process until smooth. Place the mixture in a bowl and add the breadcrumbs, milk, coriander and parsley. Season with black pepper and salt. Mix ...
Preheat the oven to 180 degrees C and grease a 30 cm cake pan with tahini. To prepare the cake: whisk the eggs in the Moulinex Masterchef Gourmet stainless steel bowl on medium speed using the whisk. Add the vanilla extract, lemon zest and sugar and ...
Peel the carrots, keeping 2 aside and slicing the rest. Peel and chop the apples. Put the sliced carrots first, in the Moulinex Masterchef Gourmet juice extractor, then add the apples. Add the orange juice and mix well. Put the juice in the refrigera ...
To prepare the dough: mix the ingredients well in the Moulinex Masterchef Gourmet until you get firm dough. To prepare the fillings: blend the pistachios and mix with the sugar, sugar syrup and orange blossom water. Put the olive oil in a bowl; add t ...
Preheat oven to 220° C. Mix the flour with the baking powder, baking soda and salt in the Moulinex Masterchef Gourmet stainless steel bowl. Add butter and mix well to get a grainy mixture. Pour buttermilk; mix the ingredients well until you get combi ...
Put the strawberries, honey, milk, bananas and ice cubes in the Moulinex Faciclic Glass Tripl’Ax blender. Blend the ingredients until well combined. Serve the smoothie in glasses and garnish with fresh strawberries. ...
Cook the garlic in a frying pan with 2 spoons of oil. Add the boiled or canned chickpeas and cook for a while. Mix the chickpeas in the Moulinex Mastechef Gourmet stainless steel bowl while gradually adding the oil and lemon juice until you get a sof ...
Boil the 2 black limes in one cup of water to prepare the lime juice. Blend the tomato and the lime juices with one stalk of celery and a bunch of basil leaves in the Moulinex Masterchef Gourmet blender, then add the sugar and salt. Slice the remaini ...
Put the chocolate sauce, milk and ice cream in the Moulinex Faciclic Glass Tripl’Ax blender. Blend the ingredients for 30 seconds until smooth then pour into glasses. Garnish the chocolate milkshake with whipped cream and sprinkle with chopped hazeln ...
Combine the coffee powder with the water and stir until coffee is completely dissolved. Pour the coffee and the sugar on the cheese in the Moulinex Masterchef Gourmet stainless steel bowl. Mix the ingredients well then cover the mixture with plastic ...
Preheat the oven to 200°C. Cut the potatoes, carrots and zucchinis into round slices using the stainless steel disc of the Moulinex Masterchef 9000 food processor. Mash the tomatoes with the chopper blade. In a large oven pan, put the chicken, vegeta ...
Shred the mozzarella cheese using the Moulinex Masterchef Gourmet shredder. Put the flour in the Masterchef stainless steel bowl with a pinch of salt, the cheese and the cold butter. Add the egg white, gently beaten, to the previous ingredients and b ...
Combine the flour, sugar, baking powder and salt in a medium bowl then transfer the ingredients to the Faciclic Glass Tripl’Ax blender from Moulinex. Mix together the milk, oil and water then pour the mixture over the dry ingredients in the blender. ...
To prepare the first layer: put the mango, orange and lemon juices, honey and ice cubes in the Moulinex Faciclic Glass Tripl’Ax blender. Blend the ingredients until smooth then pour into glasses and put in the refrigerator. To prepare the second laye ...
Preheat the oven to 160°C. Grease a loaf pan with little butter and line it with parchment paper. In the Moulinex Masterchef Gourmet stainless steel bowl, put the flour with the cinnamon, butter, sugar, eggs and honey. Mix the ingredients using the ...
Preheat the oven to 180 degrees C and grease a baking pan with butter. In a bowl, mix the flour with baking powder, vanilla extract, baking soda and salt. In the Moulinex Masterchef Gourmet stainless steel bowl, whisk the eggs with the sugar and oil ...
Pour water and oil in ULTRABLEND +. Add flour, yeast, semolina, milk, sugar and salt. Mix ingredients on speed 4 until you get a homogeneous mixture. Heat a non-stick pan over medium heat and pour in around 2 tbsp of the mixture; wait until it’s w ...
Melt the butter in a large pot on medium heat then add the onions and the garlic and cook until tender. Add the carrots and leeks and mix the ingredients for about a minute then add the oats. Stir for 2 minutes then pour the chicken stock over the in ...
To prepare the dough, the dissolve yeast in warm milk. Leave to rest for 5 minutes and stir. Put the flour in the stainless bowl and pour the milk-yeast mixture. Add warm melted butter, salt, eggs and sugar. Fit the stainless steel bowl, the kneader ...
Sift flour, baking powder, cocoa and salt in a bowl. Melt coffee and vanilla extract in warm milk and leave aside. Preheat oven to 1800C and grease 4 ramekins with butter and sprinkle with white sugar. Put butter, eggs and sugar in ULTRABLEND +. M ...
Dissolve the yeast and salt in 100 ml warm water, cover and leave to rest for 15 minutes. Put the flour and semolina in the stainless steel bowl, fit the kneader and the lid, and run the appliance on speed 2. Gradually add the yeast / warm water mixt ...
To prepare the dough: boil the milk in a saucepan on medium heat then add ¼ cup of butter until it melts. Allow to cool on room temperature. In the Masterchef Gourmet stainless steel bowl, combine 2 ¼ cups of flour with yeast, sugar and salt. Pour in ...
Put the flour into the stainless steel bowl, and create two hollows: put the salt in one, and the yeast, sugar, lukewarm milk and water in the other. The salt and yeast should not be added together because the yeast reacts badly to contact with salt. ...
Start by making the syrup. Boil the water and sugar in a pan. Leave to simmer for about 10 minutes over medium heat until the syrup begins to thicken. Add the lemon juice and rose or orange flower water. Remove from the heat and leave to cool. In a s ...
Heat your oven at 375 degrees and prepare your baking trays with the cupcake lining inserted in the cupcake baking tray. Sift the flour and Cocoa Powder separately and set aside. Slightly beat the eggs by hand in a bowl and set aside. Mix the butter ...
Dissolve the yeast in a little warm sugar water. Set aside. Pour the milk and water in a saucepan, add salt and warm over moderate heat. Put the eggs in the mixer bowl; add the dissolved yeast, milk and water. Fit the jug and run the appliance on spe ...
Chop onion & grate carrots respectively in your food processor. Melt 4 tbsp of butter in a pan over medium heat. Add chopped onion and carrots. Cook for 6 minutes. When the onion and carrots are tender, add peas and sweet corn. Cook for 4 addition ...
Put the flour, salt and baker’s yeast in the stainless steel bowl. Fit the kneader and the lid. Run the appliance for a few seconds on speed 1 and add warm water through the opening on the lid. Knead for 8 minutes. Leave the dough to rest for 30 minu ...
Whisk the eggs in the Masterchef gourmet stainless steel bowl using the whisk. Mix the flour with baking powder and sugar in a bowl then add the dry ingredients to the beaten eggs. Add the melted butter, milk and beat the ingredients until well combi ...
Melt the butter in a large pot on medium heat then fry the onion until soft. Add in the garlic and mushrooms then stir for 4 minutes. Stir in 2 tablespoons of flour and mix well. Pour in the chicken broth and heat until it thickens while frequently s ...
Core and deseed chili peppers then roast them in a pre-heated oven over medium heat. Peel and leave aside to cool. Roast walnuts in a non-stick pan over medium heat until browned. In ULTRABLEND +, combine bell peppers, walnuts, pomegranate molasse ...
Preheat the oven to 180⁰C. Line a cupcake mold with cupcake paper. In a bowl, combine flour, baking powder and salt. Set aside. In your kitchen machine, beat the egg white using the whisk attachment on high speed until stiff peaks form. Put it in ...
Combine in a big pot the lentils, stock, carrots, onion and garlic. Simmer ingredients over medium heat for 20 min until cooked through. Add tomato paste and season with salt, cumin and red chili pepper. Remove pot from the heat and leave aside un ...
Grease and flour 10 muffin cups. Beat the eggs with the sugar. Add all the dry ingredients, then the milk and blend well. Fold in the melted butter. Fill the muffin cups 3/4 full and bake at 180° for approximately 30 minutes. ...
In a large bowl, soak the gelatin sheets into the coconut milk until soft. Add the whipped cream, mango dices, sugar and salt. Mix until combined. Pour the mixture in a pot and heat until the gelatin melts. Allow to cool. Place the ingredients in the ...
Preheat the oven to 180⁰C. Grease a tart pan with some vegetable oil. In a food processor, pulse the chickpea flour and fava beans until you get a powdered texture. Add the eggs, vegetable oil, onions, parsley, baking powder and milk. Pulse again ...
To prepare the dough: in the Masterchef Gourmet stainless steel bowl, combine the flour with cocoa and salt. Add the milk, yeast, egg, sugar and vanilla extract. Mix the ingredients for 5 minutes using the beater. Add the butter and beat for 2 minute ...
In ULTRABLEND +, combine milk, eggs, flour, vanilla extract, sugar, baking powder and oil. Mix the ingredients on speed 4 until you get a smooth mixture. Heat a non-stick pan over medium-heat and grease with some butter. Pour ¼ cup of the crepe b ...
To prepare the qatayef: dissolve the yeast in lukewarm water and leave aside for 10 minutes. In the Masterchef 9000 food processor, mix the flour, semolina, baking powder and sugar. Pour the yeast mixture over the dry ingredients and mix until well c ...
Put the flour, salt and dried yeast into the stainless steel bowl. Fit the kneader and the lid and run for a few seconds on speed 1. Add the lukewarm water through the opening in the lid. Knead for eight minutes. Allow the dough to rest at room tempe ...
Preheat the oven to 180°C and grease a cake pan with butter. To prepare the sugar syrup: in a saucepan combine the water with sugar and let boil on medium heat for 3 minutes until the mixture thickens. Add lemon salt and mix. Keep the sugar syrup asi ...
Preheat the oven to 180⁰C and coat a loaf pan with some butter and sprinkle with flour. In a medium bowl, mix flour, baking powder and salt. Leave aside. Combine eggs, sugar, vanilla extract, oil and yogurt in the cowl of your kitchen machine. Us ...
In Ultrablend +, combine mashed potatoes, eggs, garlic cloves, flour, onions and parmesan cheese. Season with salt and black pepper. Blend on high speed until you get a creamy smooth consistency. Heat vegetable oil in a non-stick pan. Pour in ¼ c ...
Combine heavy cream, cream cheese, sugar and vanilla extract in ULTRABLEND +. Mix at speed 4 for 30 secs to get a smooth mixture. Melt coffee in the boiling water and dip in half the quantity of the biscuits. Spread biscuits in the bottom of a dee ...
To prepare the crust: mix the crushed biscuits with the butter, sugar and melted chocolate in the Masterchef Gourmet stainless steel bowl on medium speed using the beater until evenly moistened. Press the mixture firmly into the bottom of a 25 cm spr ...
Preheat the oven to 250⁰C. Pour water in Masterchef Gourmet bowl. Add yeast and let sit for 10 minutes until foamy. Add flour, salt, sugar and ½ tbsp of olive oil. Attach the kneading hook. Start kneading on low speed then gradually increase the s ...
Put the flour, baker’s yeast and salt in the stainless steel bowl. Fit the bowl, the kneader and the lid. Start the appliance on speed 1 and gradually add warm water to get a smooth dough. Knead for 5 minutes.Coat the ball of dough with a little oil, ...
Put all ingredients into ULTRABLEND + and mix by using either the “smoothie” function or by repeatedly selecting the “pulse” function. Process until the smoothie is nice and smooth, taking care not to overmix as this can heat the smoothie and reduce ...
To prepare the biscuits crust: In a bowl, combine crushed biscuits and melted butter. Spread in a spring form pan and refrigerate for 2 hours. To prepare the cream cheese layer: In the kitchen machine, combine cream cheese, whipping cream, powder ...
Preheat the oven to 180°C and grease a loaf pan with a little butter. To prepare the cake: in a bowl, combine the flour with the baking powder, baking soda and salt. In the Masterchef Gourmet stainless steel bowl beat the butter with sugar using the ...
Wash the fava beans and chickpeas in cold water. Put the fava beans in boiling water for 3 to 4 minutes. Cool them in cold water and remove the thick skin. Soak the fava beans and chickpeas for 12 to 24 hours at room temperature, making sure they are ...
In Masterchef Gourmet bowl, combine flour, semolina, anise seeds, sugar, yeast and salt. Add vegetable oil and mix the ingredients until combined. Gradually add warm milk and knead until you get a firm smooth dough. Cover the bowl with a kitchen c ...
Put hazelnut in ULTRABLEND + and mix using the “nuts” function to get a smooth mixture. Add powdered sugar, cocoa, oil and vanilla extract. Start the blender at speed 3 for 20 secs. Pour chocolate spread in a small container, seal it well and refri ...
Start by preparing the dough. Place the flour and salt in the stainless steel bowl. Add the olive oil. Dissolve the yeast in warm water. Fit the bowl, the kneader and the lid. Run the appliance on speed 1. Gradually pour the yeast/warm water mixture. ...
Put the flour, eggs, oil and yeast in the stainless steel bowl. Fit the bowl, the kneader and the lid. Run the appliance on speed 1. Gradually pour warm milk while kneading until a smooth ball of dough is formed. Knead for 6 minutes. Cover the bowl w ...
Put the water in the blender jug. Fit the jug and its lid, start the appliance on speed 1. Add the flour and baking powder through the hole in the measuring cup. Increase the speed to 4 and blend until you get a perfectly smooth mixture. Leave to res ...
To prepare the filling: Mix all ingredients in a bowl and refrigerate. To prepare the dough: In a bowl, sift together the flour, baking powder and salt. Leave aside. In the Masterchef Gourmet stainless steel bowl, whisk together the milk, ve ...

Put the flour, baking powder, salt and olive oil in the stainless steel bowl. Fit the kneader and the lid. Run the appliance on speed 1. Gradually add the milk, and knead for 10 minutes on speed 2 until you get a ball of dough. Leave the dough to res ...
To prepare the dough: in the Masterchef Gourmet stainless steel bowl, combine the flour with the sugar, instant yeast and salt. Add 4 tablespoons of olive oil then pour the water. Knead the ingredients using the dough hook until the dough forms into ...
Put the sesame seeds in a warm frying pan and fry gently, turning frequently. When they are uniformly golden (or they start to jump), remove from heat. Put the sesame seeds and olive oil into ULTRABLEND + and select the “nuts” or “pulse” function. Sc ...
Preheat the oven to 180°C. In a bain marie or in the microwave oven, melt the chocolate cut into pieces with 3 tablespoons of water. While stirring, add the butter gradually a little at a time to give a smooth chocolate mixture. Allow to cool. Separa ...
Put the olive oil with the onions and cumin in a large pot. Stir the ingredients on medium heat for 2 minutes then add garlic and cook until fragrant. Add the lentils and season with salt, black pepper and turmeric. Mix well using a wooden spoon and ...
Preheat the oven to 180 c. Beat oil, sugar and eggs until well combined. Add sifted flour, bicarbonate of soda cinnamon and salt. Fold in carrots, pour the mixture into greased 20 cm round cake. Place on low rack, bake for 22-25 minutes. For the icin ...
Put the flour and salt into the stainless steel bowl fitted with the kneader. Fit the lid. Run for a few seconds on speed 2, add the yeast then increase to speed 4. Add the lukewarm water, then the olive oil and allow to run until the dough forms a s ...
In the Masterchef Gourmet stainless steel bowl, combine the flour with the salt and powder sugar. In a small bowl, mix the milk with the yeast and allow to cool then pour the mixture gradually over the previous ingredients. Mix well on medium speed u ...
Put the flour, yeast, sugar, salt, yoghurt and a spoonful of oil into the stainless steel bowl, fitted with the kneader and the lid. Mix in position 1 for 40 seconds. Add water progressively until a ball of dough forms. Increase the speed to position ...
Mix the yeast with the milk and sugar. Put the flour and salt in the stainless steel bowl. Fit the kneader and lid. Start the appliance on speed 1 and add the liquid through the opening in the lid. Knead for around four minutes until even, non sticky ...
Cut the tomatoes, red peppers and six large basil leaves into pieces. Put them through the juice extractor. Add the vinegar and three tablespoons of olive oil, and pour 150 ml of water into the feed chute to «rinse» the juice extractor basket and col ...
Blanch the fava beans for 3 to 4 min, rinse under cold water and remove the skin. Soak them for 24 hours at room temperature, making sure they are completed covered with water. Drain and rinse. Put them in a pot, add garlic and two peeled and chopped ...
In the stainless steel bowl, put the flour, dissolved yeast, salt and sugar. Fit the kneader and the lid and run the appliance on speed 1 to blend the preparation. Gradually pour warm water through the opening on the lid, and then add olive oil. Run ...
Cut the butter into smallish cubes and tip into a medium bowl. Break the dark chocolate into small pieces and drop into the bowl. Fill a small saucepan about a quarter full with hot water, then sit the bowl on top so it rests on the rim of the pan, n ...
Put everything into ULTRABLEND + and select the “nuts” function. Lightly blend, leaving some small pieces in the mixture. Stop the blender when you have your desired consistency. The mixture shouldn't be too thin; it should resemble a paste. Take a s ...
Preheat the oven to 200 degrees C. To prepare the dough: in the Masterchef Gourmet stainless steel bowl, combine the flour with the sugar, dried yeast and salt. Add the water and 2 tablespoons of olive oil then knead the ingredients well using the do ...
To prepare the base: in ULTRABLEND +, combine biscuits with walnuts, and use the “nuts” function until you get a smooth mixture. Place mixture in a bowl and add the butter. Mix the ingredients until combined and spread in a baking tin. Refrigerat ...
Put everything into ULTRABLEND + and select the “nuts” function. Lightly blend, leaving some small pieces in the mixture. Stop the blender when you have your desired consistency. The mixture shouldn't be too thin; it should resemble a paste. Take a s ...
Wash & slice the mushrooms. Preheat olive oil in a pot and stir fry the garlic until fragrant. Add sliced mushrooms and cook until all the moisture is released and all the liquid is evaporated. Add butter and cornstarch and stir to coat the mushro ...
See the services


